Farmers Make Plans – goats laugh!

Standard
Farmers Make Plans – goats laugh!

A bumpy learning curve on the goat breeding path

It’s been a rough ride these past couple of weeks! Did we make multiple mistakes? Or did one mistake compound all the other mishaps? That’s a moot point, but I hope anyone planning to breed goats can learn from our negative experiences and hopefully avoid them.

Handsome Henry.

In the past we’ve had difficulty locating a buck for breeding purposes and then timing his presence with heat cycles. We also didn’t want a large buck as the girls we wanted to breed are on the small size. Handsome Henry, half Nubian, half Nigerian Dwarf seemed like the perfect solution, so we bought him. It was earlier than we would have liked, but we thought we could keep him in a separate stall until the time was right to breed for late spring births. Henry had other ideas. He’s a gentle, well behaved fellah, but also very determined when it comes to affairs of the heart. No gates or latches were high or strong enough to keep him from the objects of his affection. The consequence was that our ladies all became pregnant much early than we had planned which meant they would be birthing in the coldest part of the winter.

This was not good, but what made it worse were the weekly storms and freezing temperatures that have been endemic to this winter. We’ll never know whether or not it was one of these storms that caused earlier births than we’d expected! The fact remains that we had not yet isolated our does in their separate birthing pens when two of them decided to give birth simultaneously. Apparently there’s a window of ten days during which goats can control their time of birthing, either delaying or advancing it. We had not known of this phenomenon, not that foreknowledge could have changed what happened.

Four newborns, two mothers

Had we known, we might have isolated the mom’s sooner, but instead we went out to the barn one freezing cold afternoon to find four, shivering wet newborns and two confused moms. It seemed they weren’t sure who was whose, and we certainly didn’t know. This meant that we couldn’t separate them at this point and were forced to leave both mom’s and all the kids together in the one pen. Not ideal.

Next problem was that it was the first birth for one of the does: her mothering instinct seemed not to have clicked in and she also appeared to have a very tender udder and flatly refused to feed anyone. For the first couple of days the other doe was attempting to feed all four babies but quickly gave up on that, aggressively rejecting one of them, to the point that we had to rescue it. What we didn’t know was that one of the other babies was also not getting enough to eat and it became hypothermic after one particularly cold night. For most of one very stressful day we attempted to get its body temperature back up to normal but it eventually died.

Dealing with hypothermia – some things to consider

We have wonderful neighbors who are also paramedics and we learnt a lot about treating hypothermia on that cold and heart-breaking day.

It’s essential to raise to core body temperature before the extremities

Stoking up the wood stove and keeping an ongoing supply of warm towels to wrap it in was obviously not near enough, so then we wrapped it in a down-filled jacket and used a hair dryer to blow air in through one of the sleeves until we could construct a hot box – any kind of box that’s totally enclosed except for one hole to blow hot air in through and one to vent it out of. As a last resort we wrapped the baby in a plastic bag and submerged it in a warm bath. All these efforts did finally pay off by raising its temperature but shortly after reaching this desired goal, the poor little thing expired. The exact cause is hard to identify: it was most likely hypoglycemia, all the sugar resources having been used up by the effort of trying to keep warm, but there was also the possibility that it too had been rejected by the one harried doe trying to do the work of two. There could also have been a pre-existing condition that was preventing it from absorbing nutrients. We’ll never know for sure, but if we had weighed the babies consistently from birth would might have noted that it was losing, rather than gaining weight. One hard lesson learned! Another lesson being that even if hypoglycemia is suspected, nothing should be forced into the patient’s mouth. (We did risk rubbing its gums with a little diluted molasses.)

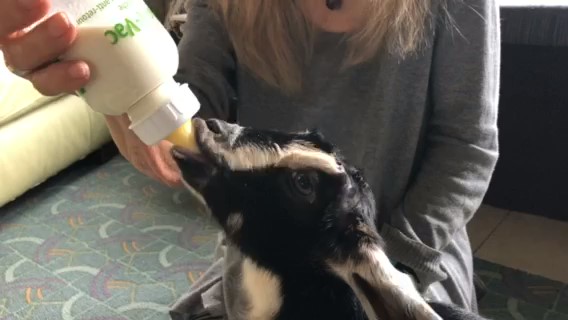
Reintroducing a rejected baby goat

Not surprisingly this experience made us overly protective of the other baby that had been rejected. We kept it inside during a bitterly cold night and bottle fed it a couple of times before making several attempts to reintroduce it to the doe we thought was most likely to be its mother. We had fed it milk substitute (the equivalent of baby formula for goats) when we should have expressed some milk from the doe. Apparently, the mother doe smells the urine of the baby and knows the smell of her own milk, ergo of her own baby. There’s also the issue of colostrum, the first fluid secreted by the mother which is rich in antibodies and strengthens the offspring’s immune system. We knew our bottle-baby had fed a little bit from both mothers and so were not so worried about colostrum intake, but we didn’t know about the milk/urine identification by the doe. The mother simply would not accept the baby (to the extent of biting half its tail off during a body slam) so it’s now a semi-permanent house guest

One hungry goat !

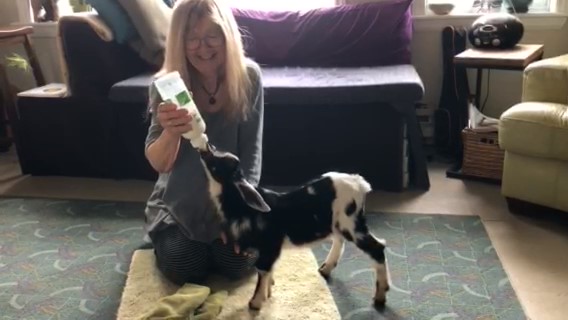
This has been a long and arduous post but I hope it might save at least a few others to avoid the mistakes we made. Next post will be much happier I promise, with pictures of frolicking kids and bottle-baby Abigail.

2022 Year of the Tiger

Standard

Brave, strong and independent – Just some of the characteristics attributed to this year and certainly all traits needed by any homesteader. Not that we have any complaints here on QuackaDoodle as we keep warm, well fed and feeling relatively secure in these times of global turmoil.

The image of a tiger, created with swirling lines and stylized floral shapes is headlined with the words: Year of the Tiger and the subtext reads: Tiger's auspicious gifts are raw power and uncommon courage

This image borrowed from BuildingBeautifulSouls.com

We’re only half way through January and already the days are noticeable longer. Even though sometimes it seems that Spring is never going to come, it does have a way of sneaking up, so it’s never too early to start planning this year’s garden. Spring will come, the unknown factor is when, and what kind of growing season will follow in its path. Unlike many parts of Canada, here on the east coast we did not experience catastrophic droughts, floods or wild fires, so I wouldn’t dare to complain that we had an unusually cold, wet Spring last year (which we did). My point being that, as weather patterns become increasingly erratic, we need to be prepared for crop failures along with phenomenal successes. Expect surprises! What has never done particularly well before might be the rock stars of this year garden. As good an excuse as any to be adventurous and to try at least two things you might have been hesitant to try.

Close up of shiny black berries surrounded by some broad, flat leaves
Garden Huckleberries

I’d like to give a shout out for Garden Huckleberries (which are not the same as wild huckleberries); a new fave. we discovered by trying something new. They don’t seem to be very popular and I suspect this lack of popularity stems from the fact that they are not a pick and eat type of berry like blueberries or raspberries. Garden Huckleberries have a bland almost unpleasant taste when raw, and along with the reputation of being poisonous until fully ripe, it’s little wonder they tend to attract bad press, rather than praise.

So, in praise of Garden Huckleberries:

They’re rugged plants that require little to no attention once established.

They provide a profuse crop which is very easy to harvest.

Once cooked, and yes, they do require some sugar, they have a uniquely delicious, slightly musky flavor which is especially appealing in chutneys and jam.

The berries have a relatively firm skin and therefore keep remarkably well.

When cooked, they color up into a gloriously rich shade of magenta, (for me reason enough for growing them).

Garden Huckleberries grow well from seed. I typically get 100% germination. However, they must be planted extra early, and inside. At first they’re quite slow to attain any height or heft, but after a month or more of setting around, seeming to do nothing, they take off and grow like crazy into multibranched ‘bushes’ about three to four feet high.

Leeksalso deserving of a little shout out.

three leeks, three potatoes - a water color illustration
*Leeks and potatoes make a simple but super satisfying soup.

These lesser utilized members of the allium family also need to be started very early and indoors. They are slow to germinate and grow, but once established they require little to no particular care, other than a good initial mulch. Leeks are also a rugged crop that can withstand a fair bit of frost and freeze. They perform brilliantly in stir fries, quiches and such, but my absolute favorite is Leek and Potato Soup, the ultimate comfort food on a cold winter night. And of course, if you have even one drop of Welsh blood running through you it’s mandatory (not really 😉 to grow some leeks as they are the national symbol of Wales. In truth, their delicate onion flavor is more than enough reason to consider growing leeks this year.

*The illustration shown above is one many that I did for my book, The Food Lover’s Garden, which is lavishly illustrated with similar images and also numerous shots of my growing beds here at QuackaDoodle. The Food Lover’s Garden was written especially to encourage more people to consider growing more of their own food, and focuses on many failsafe, easy to grow food crops. Perfect for absolute beginners and a great support for Winter dreaming. It’s available online, at most major bookstores or directly from me.

book cover of The Food Lover's Garden Shows two hands holding a bunch of fresh picked greens, possibly spinach or tatsoi.
The Food Lover’s Garden

Making it Happen!

Standard

Snow covered garden

It’s March in the Maritimes!

Only a week ago all the garden beds were covered with a thick blanket of snow, glazed with a glass-like veneer of ice, but miraculously,  after a couple of days, and nights, and days of rain, most of the snow has gone with only a few  stubborn fringes remaining. It’s definitely time for action, if all the winter dreaming is to transform into reality!

Starting seeds in pots and recycled salad boxes

Herb pots and recycled salad boxes seeded with hardy greens

While it’s still too early, (make that impossible) to be planting directly outside, it’s the perfect time to be starting some early greens, and herbs inside. Some of the herbs I’ve started are Basil, Summer Savory, Sweet Marjoram and Parsley. (In the interesting but totally irrelevant fact department – I discovered only yesterday that Summer Savory is virtually unavailable west of Ontario, even though it’s ubiquitous in the Maritimes.)

Baby Kale

Boxes of dirt will soon look like this.

I’ve also seeded some hardy greens, such as kale, arugula, and tat soi. For the past couple of months, our ‘fresh’ salad greens have been coming packed in plastic boxes 😦 Not happy about this, but on the up side they make handy seed starting boxes, which can be easily transferred to outside beds once the threat of temperatures dipping into the minus double digits is no more. In a couple of weeks, prior to sinking the boxes into the garden beds outside, I simply need to slice the base off the plastic salad containers, enabling the roots of the seedlings to continue stretching out into the soil.

Leeks and potatoes

Planning next winter’s hearty meals should start now!

Whereas it’s still probably a bit too early to be starting brassicas and more tender plants, such as tomatoes and peppers, it’s definitely a good time to start leeks. Without a heated greenhouse or special grow lights (neither of which I have) tender plants seeded too early indoors will become spindly as they stretch towards the light. Nothing is gained by trying to get a jump on Spring.

However, leeks, being slow to germinate and grow, do benefit from a super early start and they are very forgiving little critters that don’t object to a bit of ‘rough’ handling come transplant time.

Seems to me that leeks aren’t appreciated half as much as they deserve, and perhaps a certain amount of this is due to the fact that they are so slow to grow. Seeding at the traditional May/June planting time here in the Maritimes would definitely result in a disappointing crop.

Leek flower

Gathered last fall this leek flower supplied all the seed I need for this year

Giant leeks

A few small seeds will become a bountiful crop when given enough time

Because the early start seedlings don’t much mind having there roots disturbed when it’s time to set them out, a whole crop of leeks can be started in one large pot. This efficient use of space makes it simple to start up a pot of leek seeds. It’s well worth the tiny bit of effort involved as leeks are hardy, not prone to disease, are super tasty, frost tolerant to a remarkable degree and store really well once harvested. Leaving a leek to overwinter will allow it to produce a magnificent flower head that will supply more than enough seed for the next year. What’s not to love about leeks?

For more about growing, harvesting and enjoying leeks check out

 The Food Lover’s Garden!

book cover

Food Lover’s Garden, written and illustrated by Jenni Blackmore


Under the Harvest Moon

Standard

A couple of nights ago the Harvest Moon (a.k.a. the Full Corn Moon)

a collection of squash

The Autumn harvest begins

rose bright orange as if to remind that it is almost pumpkin time. The moon was indeed beautiful to look at but sadly brought with it a slight touch of frost. Fortunately the frost wasn’t enough to kill anything (not around here at least) but it served well to remind that it’s definitely time to be harvesting. The daytime temperatures have been staying above normal so it’s been a little too easy to forget that we are heading into winter. However, as the Autumnal Equinox occurred on September 22nd. there’s no denying that we have officially left summer behind!

Today I planted a couple of my cold frames with some kale, spinach and arugula I’d started in lengths of eavestrough a couple of weeks ago. I really do find four foot lengths of eavestrough present a very convenient way to start seeds. (For more detail on seeding in eavestrough please go to my March 2017 post titled, S’NO JOKE). I have the cold frames well insulated with straw and some bales of spoiled hay, which looks like overkill at present but probably won’t in a couple more weeks.

seedlings in cold frame

Spinach and kale tucked in for wintering in the cold frame

I’ll be quite happy if they keep us in fresh greens until the end of December, and of course, with our weather patterns being so erratic these days, who knows, might have greens until the end of January, or on the less optimistic side, only until the end of November. Every year is so different and seemingly unpredictable and I think the best way to avoid disappointment is to disallow any great expectations right from the get-go. This approach leaves plenty of room for pleasant surprises 🙂

Every year is so very different, and increasingly so, I find.

Giant leeks

These leeks are the biggest I’ve ever grown!

For instance, this year my leeks are ginormous! And so are my cabbages. This might not be particularly noteworthy except that I’ve never grown a decent sized cabbage in my life! I truly believe that Mother N. gives us what we will need to survive and as these are both what I think of as winter crops, I find myself anticipating a hard winter. Haven’t harvested the potatoes yet but it will be interesting to see if they support this theory.

Strangely, yellow crook-necked squash, which usually wink out as virtual no-shows, have been highly prolific this year, whereas my zucchinis faltered and hardly produced at all. Most of the squash plants are gradually succumbing to powdery mildew now. This is what usually happens  sooner or later, but this year it seemed to hit much later, perhaps because the record high temperatures we experienced kept things much dryer and eliminated the sea mists.

This year the most cruelly blighted award goes to the egg plants in the green house. First of all the aphids moved in, and much as I’d like to think it was solely the work of the few ladybugs I was able to capture and transport to the green house that eliminated the aphids, I suspect it was also the intense heat that helped do away with them. The weakened plants then developed a severe infestation of flea beetles followed by leaf spot.

I really didn’t think there was much hope for these poor plants but I noticed that new growth seemed to keep persevering. Thinking I had nothing much to lose I finally gave way and bought some Sulphur. Remembering that my mother always kept a plug of Sulphur in the dog’s drinking water years ago (don’t ask me why because I have no idea, only that it was meant to keep the dog healthy) I reasoned that a little sprayed on the egg plants wouldn’t hurt. It was the first time I’d resorted to anything other than herbal remedies and I was delighted with the results. All the affected leaves eventually crinkled up and fell off, but any new growth carried on as if nothing had been wrong, as has the fruit. Not the healthiest looking harvest ever, but certainly better than nothing.

I actually got around to canning some grape leaves so I can make dolmades. Have been meaning to do it for years but never got around to it. Can’t believe it’s so easy or that it has taken me this many years to do it! And there’s still time and lots of perfect leaves to make more 🙂

Grape leaves being rolled

Once the leaves have been blanched for a few seconds they are very obedient. Stacked and rolled I was able to put around thirty-five in each jar.

Canned grape leaves

So easy to set in brine and so wonderful to have long after all the leaves outside have blown away

I always find this time of year to be rather sad, with so much beautiful growth coming to the end of its cycle, and certainly overwhelming, as the amount of preserving required to process of the bounty starts to seem monumental but my predominant emotion has to be amazement at the amount of wonderful food those  scant handfuls of seed produced. Thank you Lord!

My fave pick this week has to be the ground cherries. Despite the fact that they are unruly plants and difficult to harvest the thought of having a fresh bowl full on the counter everyday for the next couple of weeks makes them so worth the effort.

Black bowl with ground cherries

Yum! That’s all I can say.


In Praise of Parsnips

Standard

I know! Way beyond the planning stage for many (if not most gardeners) but here in the Maritimes, and especially on this little island of ours, it’s staying cold! I believe that May 24th. used to be the traditional planting day but at the rate things are warming up (sloowlee) it will be well into June before the ground will be warm enough for beans, squash, potatoes and other such warm-soil lovers. Even the kale, lettuce and other less fragile plants seem to be dragging their feet (or should that be roots?). However, things are bound to warm up sooner or later and probably overnight – this, having taken the Gardeners Vow of Eternal Optimism, we have to believe 🙂 – and with that belief gripped tightly in one hand, lists are being made. What to plant? And where and when?

One giant parsnipThis is where I’d like to give a shout out for parsnips, a vegetable I feel does not receive the attention or respect it deserves. I’ll start with the cons. and end with the pros. so that all my glowing recommendations will erase the very few less conducive facts about growing parsnips. So, here goes:

Parsnips tend to be very slow to germinate, in my experience. I have also found that their seed germination rate is never one hundred per cent. This tends to back up a theory I have (this just a theory of mine – not backed up by any scientific evidence {just experience}). A parsnip left in the ground to mature produces a massive amount of seed in it’s second year- if every one of these seeds germinated the world would be inundated with parsnips! I believe that parsnips have to produce a lot of seed to compensate for their poor rate of germination.

Because of the unpredictable germination rate, I tend to seed quite heavily, which brings me to the next ‘issue’ with parsnips – they like their space! Whereas beets, and carrots will,to a certain degree, tolerate snuggling up close with their siblings, parsnips will not. They like their elbow room and, paired with heavy seeding, this can result in the need for fairly intensive thinning once seedlings emerge. Not a fave. pastime of mine. However, these two little quirks pale in the glow of a perfect parsnip.

parsniparsnips, newly dug laying on the ground

After a winter in the ground these newly dug roots are as fresh and tasty as could be

Parsnips are sweet! And tender! They’re highly versatile and also extremely nutritious – especially good for healthy heart and weight maintenance. What’s especially cool about parsnips is that they will over-winter, so first thing in the Spring, as soon as the hard frost leaves the earth, you can go out and dig some beautiful fresh produce. How do I love them, let me count the ways – roasted, fried, added to a veggie soup, mashed with carrots or potatoes and, most dearly, made into one of my special faves, curried parsnip soup.

one giant parsnip!

This second year parsnip actually grew quite a bit bigger and certainly much more robust – it took an axe to bring it down.

A touch of frost really helps to sweeten the taste even more so, ergo, parsnips that have overwintered are especially delicious! One thing to remember when harvesting overwintered parsnips – dig them as earlier as possible. When left in the ground too long they will turn woody and begin to sprout a stem, which in time will bear oodles of seed.

This is, of course, is how biennials reproduce, by taking two years to complete their cycle. It really is a good idea to leave one root in the ground and harvest your own seed in late summer of the second year, especially as parsnip seed loses much of it’s efficacy after year one. You really need to plant fresh seed each year. And here’s a thing I’ve been noticing – our local seed supplier has stopped putting ‘date packed on’ and a ‘use before date’ on their seed packets. I have a real problem with this because I know that shelf life of seeds varies considerably, some only being good for one year. If I have to buy some seed, and pay an exorbitant price for it, I want to know it’s fresh. So, a word of warning – check dates on any purchased seed (it is usually at the base of the flip side of the packet) and if there is no date shown, be wary!

When planting parsnips, take good care to keep the ground moistened – I have covered my rows with some old burlap to help preserve moisture, and have been watering them anytime we don’t have rain for a couple of days. I have not had to water much so far this year 😦 I have seen it suggested that planting a row of radishes along with the parsnips to mark the row. I did try this once but it seemed to me that harvesting the radishes disrupted the tiny parsnip seedlings so this is not a practice I favor. It certainly does help to demonstrate how much slower parsnips are, compared to radishes. The take-away here is Grow some parsnips! Just be patient.

For anyone in the Halifax area, mark this date! June 16th. The Halifax Garden Festival

https://www.facebook.com/HalifaxGardenFestival

cover of Permaculture For The Rest of Us

Permaculture For The Rest of Us ~ Abundant Living on Less than One Acre

I will be there with copies of my books and an interesting assortment of what I call ‘Purposeful Plants’ for sale. I will also be giving a short presentation in the ‘talk tent’ on the purposes these plants serve. Hope you can make it and if you’re there, please drop by to my booth to say Hi!

Food Lover's Garden bcover

Front Cover of my new book – available at most book stores or signed copies at the Halifax Garden Festival


Easy Peasey!

Standard

purple crocuses

They just popped up to confirm that yes, it is Spring.

What a difference a couple of days can make! Spring seems to have sprung overnight and scowling complaints about April snow have been replaced by smiling faces and joyous amazement at the brilliant weather we’re experiencing here in Nova Scotia. Yay! I was wondering if I was pushing my luck planting early peas (snow peas) but now I’m glad I did.

A Word or Two on Planting Peas

There are lots of choices! The two main categories are edible pod, which tend to produce a smallish pea (fabulous in salads and stir-fries) and the more typical pea that needs to be shelled (as served with meat and ‘taters) – there are sub-categories to each of these, which include edible pod which also produces larger peas and larger pea varieties that tend to be less sweet but are especially good for drying. There are also ‘bush’ peas but I always seem to have better success with the more typical peas that grow on vines and need to be supported (even though they are a bit more work). To add to the confusion there are also some very early varieties and others that are better able to withstand the heat of early summer. Planting peas certainly requires some decision making which will be influenced by personal wants. The best solution, I think, is to plant a couple of different varieties, if space allows, and then to stagger the planting a week or so apart throughout the first few weeks of Spring.

When planting peas it really increases the yield to use inoculant. This is a naturally occurring bacteria (I believe derived from peat moss)for use with peas, beans and lima beans. It increases the yield big time and improves the soil. Inoculant costs around $8.00 for a small package but it goes a long way and is very easy to use.  Check the date on the package – inoculant has a short shelf-life and last year’s inoculant is no longer viable!

Some people prefer to soak legume seeds overnight to soften them up and get them in the mood for sprouting. This requires a certain amount of pre-planning – something I’m not good at. (Seeds left soaking too long will sprout and eventually rot, if not planted.) After having my planting delayed so often, for a myriad reasons, I now simply soak the seeds for a couple of hours on the day I’m certain they will be going in the ground.

peas coated with inoculant

These peas (damp) were gently rolled around in some inoculant, in a 125 gm. mason jar and need to be planted immediately

To apply the inoculant, I use a small (125 gm) mason jar. The jar is dry inside but the seed is damp so that when it’s rolled around in the inoculant it becomes well coated and ready to plant. Have heard that a half ‘n half mixture of whole milk and molasses works much better as it serves to nourish the nitrogen fixing bacteria, but I haven’t tried this.

One thing I have learnt – Less is more and a little goes a long way. The inoculant resembles very finely-powdered charcoal and it really doesn’t take much to coat more legume seeds than might be expected. Also, it’s important to remember that once the seeds have been coated they should go in the ground immediately. What might look like scant amounts of seed and inoculant will probably prove to be more than enough for a typical home garden. It’s easy to coat a few extra seeds if needed but it can be a nuisance having to search around for more places to plant an excess of coated seed.

Peas prefer to be planted in a shallow trench, which is gradually filled in as the sprouts appear. This eliminates the need for the first tender shoots to be forcing their way through too much soil, while at the same time allowing the roots to be generously covered in the heat of summer. However, this is not essential and not always convenient, especially when planting around a circular frame.

This circular pea frame is made from willow and the false bamboo stakes from miscanthus giganteus grass

Peas like rich soil but they also enrich the soil due to the nitrogen enhancing nodules that form on the roots. With this in mind, rather than pulling the whole plant (roots and all) after harvest is done, I prefer to cut the vine off at ground level, leaving the root in the ground.  Typically, peas don’t thrive all summer long and once the leaves start to lose their color and turn mottled it’s definitely time to remove these vines from the garden. They are probably affected by a disease called ‘rust’, which will spread to bean plants.

Another thing I have learnt, both about myself and about planting peas – The support frame, whether it’s a trellis, a ‘tepee’ style structure or simply strings attached to a wall, should be in place before the peas (or runner beans) are planted. It’s so easy to think that there will be time to do that later but guess what? There’s always something else that takes precedence, certainly in my life, so now (finally) I’ve learnt to have the support in place before the seed goes in the ground.

A watercolour painting of peas

I did this painting as one of the illustrations for my latest book, The Food Lovers’ Garden


Pea shoots are quite delicate, but once their little tendrils grab on to something, they don’t let go. If there’s no support, they’ll grab on to each other and rapidly become a tangled slug feast splayed over the ground

In closing, peas and beans share many similarities but they also differ in certain ways. Beans do not like cold soil and it’s certainly too early to be planting beans – peas like the cooler temperatures of Spring, beans like it much warmer. Also, a little companion planting tip, legumes do not thrive close to  onions or leeks, as plants in the allium family tend to stunt their growth.

book cover

The Food Lover’s Garden

For lots more information on growing (and eating) legumes as well as many other vegetables I hope you will check out my book, The Food Lover’s Garden. It’s available from most major book sellers and on-line from Amazon.


Spring Again! Already?

Standard

How can a year go by so quickly? My last post was complaining about the snow, on April 3rd. 2017 and guess what, one year and a few days later, that same post still holds true. We had another snow fall the other night! But not to worry, temperatures are rising and it’s definitely time to be planting some seeds! If nothing else, this is one of the best antidotes I know for fending off the April snow-lows.

Snow Mold

While on the topic of snow I want to share some interesting info. I only recently heard about – there’s such a thing as snow mold, and dogs (especially) can develop an allergic reaction to it, given their habit of snuffling along the ground. I met a wheezy dog who told me all about it, as interpreted by his owner, who’d been clued in by a vet. Apparently, spores which have become trapped under the snow are released as the snow melts. Useful to know, especially if Fall allergies seem to have returned with a vengeance.

mache or corn salad

The sweet nutty flavor of mache or ‘corn salad’ is especially welcomed in the spring and these smallish plants are tough, tough, tough! Seeds are usually marketed under the name ‘mache’ but I prefer to use the German name Rapunzel as it relates to the Grimm’s fairy tale.

I am way behind schedule as usual. Could have had first hardy greens out two or three weeks ago but Hey! I do what I do and life is good 🙂 At this time of year, with so much to be done, I do believe it’s very important not to panic or feel overwhelmed. Plants have an endearing habit of catching up and forgiving, even if they would have preferred to be put in the ground a little earlier than they were.

hens in hen poster

Hens hard at work making the Best Compost Ever!


Will be spicing my soil up with The Best Ever compost from the hen poster. Constructing a hen poster is much like the first project in rough carpentry 101. Simply nail eight boards into a square, two boards high and add chickens. It’s so totally worth constructing one of these, even if you only have a few chickens. My girls seem to think of it as their special treat spot and they run out each morning to check on the day’s offering of kitchen scraps. As they dig, scratch and rummage – and yes, poop – they produce a soil mix that’s truly magical. And while on the subject of compost, Note to Self – time to start turning the other compost boxes. Self has been slacking on the compost turning and needs to start paying a bit more attention!

a winter's worth of goat bedding gets piled up as the goats watch on

We spun all that straw into manure!

Shoveling seems to be the activity of the month! All the animal sheds need to be cleaned out. Yikes! Where’s a woofer when you need one? On the bright, but still smelly, side, a bit of hot manure added to the compost will spark it up in no time. *My yearly warning to anyone who might just be starting out on their gardening adventure – don’t ever put hot (fresh) chicken manure on your garden beds because it will burn the tender shoots. Chicken manure is brilliant, my fave, but it really does need to age, preferably for a year, and definitely for at least six months.

finer organics such as leaf mold and manure are layer on top of the twigs

Memories of setting up the hugel in the ‘Secret Garden’ We’re still feasting on the squash that grew in it last Fall and presently it is sprouting a goodly crop of garlic!

Dodging in and out between torrential rains and sneaky little snow squalls, I’ve been tidying up my ‘secret garden’ – a smallish space tucked away on the north side of the goat pasture. It has its own little micro-climate and is often ten degrees or so warmer than the rest of the property. It’s not quite wild zone, not quite food forest, but a perfect spot for unobtrusive, single-harvest crops such as berries and garlic. This is where I built my first fedge, which has developed into a robust live-fence and also where I constructed a heart-shaped hugel bed, using all the surrounding deadfall – planted squash and pumpkin in the hugel last year and we are still feasting off them. Seriously! Also put several five-gallon pots with potatoes planted in them, which did remarkably well. It’s amazing how much food came out of this innocuous little space. With that in mind I’ve decided to develop a small lasagna bed here to maximize on this little pocket of higher temperatures.

starting to build a lasagna bed

cardboard first keeps underlying weeds out of the bed.

I’d laid some cardboard down to put the potato pots on last year and it in turn seem to suggest that a small lasagna bed would fit perfectly between the two butternut trees we planted a few years ago. It’s really quite easy to throw together a lasagna type bed for early greens – first, a layer of cardboard to prevent any virulent weeds from forcing their way up from below, then a thin layer of fresh chicken manure – I know, that sounds like a complete reversal of what I said earlier, but not so. If the ‘hot’ manure is buried below the level the delicate roots will reach down to, it will act as a source of heat to warm the soil up and also to aid in the breakdown of the other organic elements layered on to of it. The important thing to remember is to create a generous buffer zone between  the hot manure and the roots of the plants by adding sufficient  layers of organic material on top of the manure.

collection of organic materials gathered to create a lasagna bed

very fresh (very hot!) chicken manure to left, seaweed to right with barn bedding – not very pretty yet but will make wonderful soil

My layers consist of hay bedding from the goose shed (including one very old goose egg which smelt truly disgusting when it exploded:-(  leaves from last year, a bale of moldy hay, seaweed washed ashore in the latest  couple of storms, compost from the hen-poster and a couple of barrows of soil, mixed with rabbit poo and a bit of sphagnum. When building soil like this, I’ve found it’s quite feasible to laydown fairly narrow trenches of additional soil, couple of inches deep, where the seeds are to be planted, rather attempt to cover the bed entirely, as this often results in a thin skim of soil, that leaves roots needing more.

farm dog at rest

Being a farm dog is hard!

In closing, a word of warning to any predators who might be skulking around – our trusty farm dog Juno remains vigilant and on guard twenty-four seven!


S’no Joke!

Standard
S’no Joke!

Here’s the latest from Green Grenouille  welcoming committee

Green Grenouille

The Green Grenouille welcoming committee are not impressed by the weather!

Grenouille No.1 – No! I can’t look at any more snow.

Grenouille No.2 – I refuse to listen to any more weather forecasts!

Grenouille No.3 – Oooops! Did I say that out loud?

Outside indeed it still looks like winter but in the cold frame most of the hardy greens are almost ready for harvesting, despite the fact the lid of the frame collapsed during one of the January storms and the little plants spent several weeks crushed and frozen under the tarp. Goes to show just how hardy tat soi, rapunzel, kale, mizuna and arugula really are! In a few weeks they won’t seem half so special but at the moment all these early greens taste A-maz-ing!

Early greens

Tat soi, kale, mizuna and arugula all growing quite happily in a makeshift cold frame


I’m always trying new ways to extend my harvest of greens and thought I’d share today’s little venture – planting in eaves trough. I salvaged a couple of pieces of eaves trough from a construction dump last year and cut into four foot lengths they gave me six troughs of a manageable size, approximately the same width as my raised beds. I’ve heard of growing lettuce etc. in eaves troughs but have always been a little skeptical, wondering how much watering is required (daily through the summer months I would imagine) and also how much nutrient needs to be pumped into the soil to sustain healthy growth.

items needed to make an eaves trough planter

Eaves trough cut into manageable (four foot) length, duct tape, old towel and some soil is all that’s needed to plant a row of kale

I’m more interested in starting seedlings in troughs indoors and then transferring them as ready made rows, that will slide smoothly out of the trough and directly into a waiting furrow in the garden. Firstly, I closed off the ends of the trough with duct tape. Coconut coir or cardboard would do just as well, I’m sure. I then cut strips of cloth (I sacrificed an old towel) that measured about a foot longer than the trough, leaving enough to allow for an overhang at each end when the strip of cloth is placed along the bottom of the trough. By doing this I hope to ease the transition from eaves trough to garden bed, causing as little disruption as possible to the roots of the plants by simply pulling on one of the end tabs of cloth and sliding the plug of soil directly into the waiting furrow. After I’ve cut away the duct taped end plugs, of course.

Seedlings ready to be transplanted

Kale seedlings ready to be transferred from a recycled commercial salad mix container into a length of eaves trough

I had seeds already started in the house that I’d seeded way too heavily. I should know better by now but I was not wholly trusting of the seed as it is several years old. I wasn’t sure how viable it would be but I think I got close too one hundred per cent germination. One more plus for kale – the seed is very robust and stores really well! I let the soil around the seedlings dry out, thinking that it would be easier to separate the delicate roots if the soil fell away easily. It did, but of course it could be argued that the tiny plants would already be stressed by this drying out and therefore the untangling of roots would be even more traumatic for them. I’ll just have to wait and see on that one.

I want to start peas in a couple of the troughs and I’m hoping this method will work well for that as well. Stay tuned!

Early spring greens growing in a tractor tire

A salvaged tractor tire set up as a hot box provided weeks of super early spring greens

And of course I’m definitely going to set up another ‘hot box’ in the old tractor tire I found washed up on the beach  a couple of winters ago. Not sure if I wrote about it last year or not, but here’s a quick recap for anyone who might have missed that post – First a layer of hot manure – I used chicken, well covered with a thick (3-4 inches) layer of organic mulch (straw, leaves, seaweed, etc.) This is to keep the roots of the plants from touching the manure, which is used specifically as a heat source and therefore needs to be ‘hot’ –  which also translates as – much too fresh to consider as a source of nutrients at this time.

Tire with some manure

Hot manure is placed in first then topped with protective mulch barrier before soil goes in

I packed the inner core of the tire with seaweed (eel grass to be specific) and then filled the central hole (where the wheel hub would go) with a rich mix of soil and organic nutrients and then I wrapped the tire in plastic sheeting until the seeds were well sprouted and the temperatures had risen. There was snow on the ground when I was doing this and I really didn’t know if I was pushing my luck just a bit but no – in the earliest days of spring I was able to pick salads from this tire, which kept producing phenomenal greens week after week after week.

Tire wrapped in plastic

The tire didn’t look like much at first!

I have had good success with hot box set ups in the cold frames but I think the black rubber of the tire helped intensify both the heating up of the soil and also aided in heat retention. On some really bitter days the temperature of the soil in the tire was usually fifteen to twenty degrees warmer than in the regular garden beds.


And finally, my new book has arrived! The Food Lover’s Garden is now in stores. The people at New Society Publishers have done a wonderful job and I am delighted with the look of this book. It’s in full color and is quite lavishly illustrated. Thirty of the images are taken from watercolor paintings I did of one of my fave. subjects – vegetables – and the forty some other images are all from pictures I took in one of my fave. places – my garden 🙂

So yes, this book feels quite close to my heart, especially as it’s all about the joys of growing, preparing and eating  good, healthy food. The official launch will be at the Halifax Main Branch Library, April 22nd. at 2.00

The really exciting thing is that all the original paintings, framed, are to be auctioned off on line during the month of May, with all proceeds going to support Soul’s Harbor Rescue Mission and Dartmouth North Community Food Center. Needless to say I’m thrilled to be able to use my art in true permaculture fashion, that is for more than one purpose – to illustrate the Food Lover’s Garden and also to support two organizations which I greatly admire!

Food Lover's Garden bcover

Front Cover of my new book – in stores now


Things Are Getting Seedy!

Standard
Things Are Getting Seedy!

Seedy Saturday poster

Seedy Saturdays are always a fun way to connect with kindred spirits and pick up some inspiration along with some seed

Yay! It’s that time of year again.

Despite the sizeable (but slowly diminishing) drifts of snow the first seed catalogues have arrived

Our local feed store even has their seed display set up – right next to the blazing, and much needed wood fire. And, as if this wasn’t incentive enough to start planning this year’s garden – well, a trip to a seed swap (Seedy Saturday) is sure to get those green thumbs out of hibernation.

Leeks and potatoes

Planning next winter’s hearty meals should start now!


At this time of year – actually it’s less than thirty days away from Spring, even if it doesn’t feel much like it some days– choices are so easily influenced by innate longings for all things summer, including what grows in the garden: crunchy greens, tomatoes, cucumbers peppers and so on.

It’s tempting to forget about the Fall crops that tide us over the winter months, forming the basis for so many hearty winter meals. Winter crops store well but generally speaking are slower growing than their summer time counter parts, which tend to gallop through their growth stages toward maturity in order to avoid the first frost. Late crops such as Brussels sprouts, parsnips and leeks don’t have to hurry because they’re quite frost tolerant.

Leeks, members of the Allium genus, are beautiful vegetables that really don’t get the attention they deserve, in my opinion. They’re easy to grow, they store remarkably well, and their mild, oniony flavor is perfect for quiches, soups and stir-frys, as well as in more adventurous dishes such as vegetable pie or a ‘modified’ spanakopita.

So, this is my shout-out for Leeks!

three leeks, three potatoes

Leeks and potatoes make a simple but super satisfying soup.

They do need to be started really early. The seed is tiny and can be difficult to space in a typical garden bed and, when they eventually poke up through the soil, they look just like tiny blades of grass. This resemblance makes it more than likely that they’ll get ‘weeded’ out. It’s much better to start leeks inside.

leek seedlings

These young leeks plants which were all seeded in one pot are now ready to be planted outside

mature leeks

Leeks are quite a compact plant and when well mulched they don’t require a whole lot of space.

Good news is that this doesn’t need to be a major undertaking, with each seed requiring its own little pot. It’s much easier to sprinkle a few seeds together in one large pot. One of the great things about leeks is that they don’t mind having their roots disturbed. This means that the grass-like leek sprouts can be left in the one pot for a couple of months until it’s convenient to transplant them. The roots will no doubt be tangled but can be gently separated and replanted. No problem.

Leeks like to be planted in trenches of rich soil and then gradually hilled up as they grow. This increases the size of the white, tender base of the leek. They do also need plenty of water to really flourish. Heavy mulching will help with water retention, will keep the weeds away and will also help to keep the soil cool. This puts leeks in their ‘happy place’, and once they’ve been ‘happily’ bedded in I find leeks to be pretty much hassle free.

The hilling up of leeks can result in some particles of dirt getting trapped under the outer layers of the leek. No problem! There’s a super easy way to clean leeks. Simply slice down the centre of the leek from top to bottom, holding firmly onto the base of the leek, then dunk it a few times in clean water. Any soil particles will be instantly released – it’s that simple. They’re now ready for slicing into your favorite dish. Mine is leek and feta quiche, with cream of leek and potato soup a close second.

a leek being ceaned

To clean a leek simply trim and slice vertically before dunking several times in clean water.

Leeks are the emblem of that so wonderful country of Wales (okay, so I’m slightly biased!) so why not plant some leeks on March 1st in honour of St David’s Day (the patron saint of Wales) and to scratch that itchy green thumb but mostly to ensure a good crop of this super nutritious allium that will store for many months and grace no end of delicious meals.

My big news is that my new book, The Food Lover’s Garden, is at the printer’s and slated to be in the stores around March 21st This book is in full color and I got to illustrate it with thirty some watercolor paintings of one of my favorite things – vegetables – as well as forty some photographs all taken right here at QuackaDoodle Farm.

Food Lover's Garden bcover

Front Cover of my new book – due in stores March 21st. 2017

It looks like the designer has done a magnificent job and as usual all the folks at New Society Publishers have been wonderful to work with. I feel truly blessed to be working with such an ethical and efficient company that strives hard to produce the perfect, eco friendly product. Kudos to them!